What can you do with all those fabric scraps you have sitting around? Make cute little Christmas ornaments for your friends!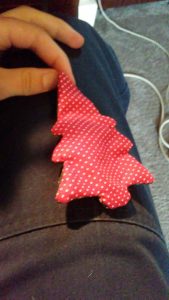
Even those scraps that are too small for other projects can be used for these adorable ornaments.
You will need:
- Christmas-themed cookie cutters…shapes with bigger angles and few corners will be easier (stars, candy canes, hearts, gingerbread men, angels, etc. I also used a Christmas tree, but it took more work to get right)
- Cardboard (such as empty cereal box)
- Pencil
- Pins
- Lace or ribbon (3/8″ works well…if it gets wider than, say, 1/2″, it won’t work so well)
- Stuffing
- Needle/sewing machine and thread
- FABRIC SCRAPS 🙂
1—Cut Patterns
First, make your patterns. You could just use the cookie cutters as patterns, but they stick up and make it awkward to trace onto the fabric.
So take your cardboard, place your selected cookie cutter onto it, and use the pencil to trace your ornament’s shape.
There are two methods:
Method A

Here you can clearly see my stitches trying to follow the pencil lines…
Cut cardboard exactly along the lines of the cookie cutter’s shape.
Method B
Using a ruler, extend the “shape” out about 1/4″ on all sides, then cut out the cardboard along these new lines.
Pros and Cons
With Method A, you have to remember to leave a 1/4+ inch hem around the fabric when tracing your pattern…but you then have a handy pencil line to help you stitch the shape.
I initially invented Method B so I could make the ornaments bigger, but when you just “balloon out” the line of the cookie cutter’s shape, the new shape doesn’t look the same (it looks more fat and rounded). On something like a star, this works better.
The benefit of Method B is that you can 1) make your ornaments slightly bigger, or 2) you have a built-in allowance for the hem, and can cut out your fabric directly on the pencil line.
I prefer Method A, however, because having that line to stitch along is sure useful.
2—Trace Onto Fabric and Cut
Take your cardboard pattern and place onto your fabric scraps. Even if you have a really small piece – as narrow as two inches! – you can probably fit a candy cane shape on it! Just remember to be sure you have extra space for the hem.
Once your pattern shape is traced, cut out the pieces (again, leaving roughly a 1/4″ for the hem).
3—Match Fabric Pieces and Pin
Once you have two fabric pieces of complementing colors cut out, hold them Right Sides together and pin.
I like to use joints or corners to make sure I have the shapes matched up to one another…for example, stick a pin into the peak of the Christmas tree on one piece, and then through the peak of the other Christmas tree piece…or stick a pin through the matching armpits of two gingerbread man pieces.
Stick two pins through matching points along your shapes…and then use them as “fulcrums” to align your pieces.
4—Sew Pieces Together
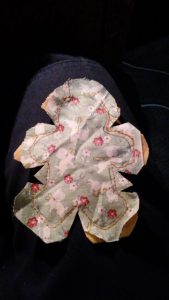
Sew the pinned pieces together — leaving at least an inch open at the top for turning.
 I was constantly second-guessing myself that I wasn’t leaving enough space to turn the ornament…and once I even snipped the stitching to make the opening bigger. Don’t do this! The stitches will pull out and you’ll have to repair it and it’ll be annoying…
An opening of an inch to an inch-and-a-half is plenty big. Just remember to put it at the top of the ornament…
5—Snip Corners
Gingerbread men’s armpits, the boughs of Christmas trees, and the hooks of candy canes all need to be sniped out to make turning easier! Just be careful not to snip your stitches (ask how I know).
Also make slits around the gingerbread man’s hands and feet, the points of the Christmas tree and the star, the curve of the candy cane…you get the idea.
6—Turn Inside Out
Turn your ornament inside out, through the small hole you left. Be patient and take your time…even if you think, “This hole is way too small to fit the fabric through!” if you take your time, it’ll usually work.
Get something long and pokey to help get the corners turned out. I started with the eraser end of a pencil, but that was poking right through my seam and tearing my stitches — so I went for a large crochet hook.
7—Sharpen Points
You might need to use a pin to grab the points and help pull them out…This is especially true for the Christmas tree, but also for the gingerbread men’s feet (and hands).
Basically, for the Christmas tree to actually look the way it’s supposed to, you need to pull all the little branches out…and for this, it usually works best to use a combination of the crochet hook and a long pin.
Just remember: this is your chance to get it looking the way you want it to!
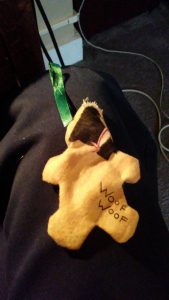
 (I made a dog ornament, making my own pattern based on a silhouette from online…and getting all the nooks and crannies turned right-side-out was a pain! On the bright side, it did look like a dog at the end! The key is to take your time and pay attention.)
(You could iron it at this stage to make it nice and crisp and neat…but who has time for that nonsense?)
8—Stuff
I used polyester fiberfill…but use whatever you have on hand. Use the back end of the crochet hook to help you get it into those hard-to-reach legs, branches, and bends.
Don’t over-stuff it…This is just to give it some body, not to turn it into a plush toy.
Stop when it feels good to you.
9—Hanger
 I usually used between 2-1/2 and 3 inches of ribbon or lace for the hanger. (This assumes that it’ll still need a paperclip-style hanger to go on a tree.)
This is my typical procedure:
Take the end of the ribbon/lace…estimate a thumbnail’s worth to go inside the ornament…hold the ribbon behind the ornament and bend it in a loop until it looks long enough…pin the loop flat…and snip the ribbon off, level with the ribbon-end.
Then, using your thumbnail to help with the placement, stick the ribbon ends into the top of the ornament and fold the loose fabric down on itself, so it looks neat and closed over the top of the ribbon.
Pin firmly, then check the back-side to make sure your raw edges are all hidden, and your ribbon hanger is inside the fabric on both sides.
10—Stitch Closed
Stitch along the top of the Christmas ornament, closing the hole and fastening the hanger at the same time.
Check the back side when you’re done to make sure the stitches grabbed both sides of the fabric (ask how I know).
Optional—Topstitch
At this point, you can top-stitch around just inside the seam of the ornament. I only did this with one of mine (because my seams were messy and it needed extra reinforcement)…but with contrasting colors of thread, it could look very nice.
Enjoy and Give Away!
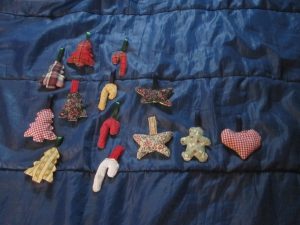 I worked on these in stages, focusing on cutting out, turning/stuffing, ribbon-ing/stitching, or sewing… I could usually knock out ten ornaments on a lazy afternoon.
Not only is this a great way to eat up those itty-bitty scraps of fabric, but it makes adorable (and seasonal) little gifts for your giving needs!
In fact, with “neutral” shapes like hearts and butterflies, you could make pincushions for everyday use…make Easter ornaments (those are totally a thing, right?)…show someone who’s sick that you care…
They’re small enough – yet challenging enough – that you could use them to introduce your child to sewing.
Okay, I’m done. I actually have a basket-full of these I’m giving away for Christmas.
Happy crafting!
 Kimia Wood was raised by an aspiring author, so spinning words and weaving plots is in her blood.
She currently lives with her family somewhere in the American Midwest, bracing for the collapse of society by knitting, baking, writing, hobby-farming, and reading as much Twitter as possible before the web goes dark.
Subscribe to the mailing list for a FREE e-copy of her post-apocalyptic adventure novella Soldier! You’ll also receive periodic updates of her latest reading and writing adventures.


